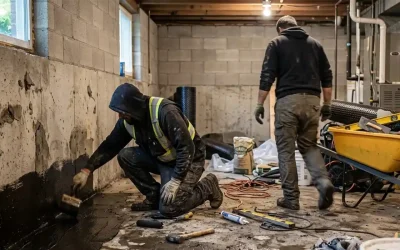
When it comes to construction, a solid foundation is everything. Helical piles, also known as screw piles, are an increasingly popular choice for both residential and commercial projects due to their adaptability, quick installation, and ability to handle various soil conditions. Whether you’re working on a home renovation or a large-scale commercial build, getting the installation process right is critical to the project’s success.
This guide walks you through the steps of helical pile installation, helping you understand the process from start to finish and why it’s essential to get it right.
Understanding Helical Piles
Definition and Components
Helical piles are steel shafts with screw-like plates attached to them. These plates, or helices, allow the pile to be screwed into the ground, creating a secure foundation. The main components include the shaft, which is the long steel rod that makes up the core of the pile, and the helices, which are the spiral-shaped plates that help the pile dig into the ground and stay in place.
Applications of Helical Piles
Helical piles are widely used across different types of construction projects. In residential projects, they’re perfect for stabilizing sinking foundations, building home additions, or providing support in areas with poor soil conditions. On the other hand, in large-scale commercial projects like office buildings or industrial structures, helical piles offer a reliable foundation, supporting heavier loads.
Benefits of Helical Piles
Why choose helical piles? Here are a few reasons:
- Quick installation: Helical piles can be installed much faster than traditional foundations, reducing downtime.
- Minimal disruption: Because they require less digging, you can avoid much of the mess and disruption associated with other foundation types.
- Works in different soil conditions: Whether you’re dealing with clay, sand, or rocky soil, helical piles can be adapted to suit the environment.
Pre-Installation Considerations
Soil Testing and Analysis
Before any installation, it’s essential to understand the soil you’re working with. A few common soil testing procedures include:
- Standard Penetration Test (SPT): Measures soil density by driving a sample tube into the ground.
- Cone Penetration Test (CPT): Assesses soil strength and composition using a metal cone.
The results of these tests will help determine whether helical piles are the right choice and what adjustments, if any, need to be made for a successful installation.
Also Read: Understanding Load Capacity: How Much Weight Can Helical Piles Really Support?
Load-Bearing Capacity Assessment
The load-bearing capacity tells you how much weight the helical piles can support. Calculating this is essential to ensuring the foundation holds up over time, especially in commercial projects with higher load demands. Factors to consider include:
- Soil type
- The size and length of the piles
- The number of piles being installed
Step-by-Step Helical Pile Installation Process
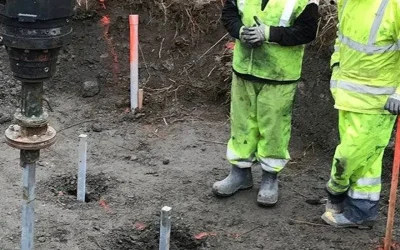
Site Preparation
The first step is getting the site ready. Clearing and levelling will remove debris and ensure the ground is even. Based on your project’s design, each pile will be marked where it will go to ensure proper alignment.
Equipment and Tools Needed
To get the job done, you’ll need a hydraulic torque motor to screw the piles into the ground, a mini-excavator to move and manoeuvre the piles into place and the proper protective equipment to ensure you are safe, including gloves and helmets.
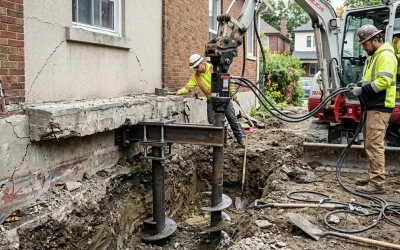
Installation Steps
The actual installation process is relatively straightforward:
- Position the pile: Place the helical pile at the designated location.
- Drive the pile: Using a hydraulic torque motor, screw the pile into the ground.
- Monitor the torque: Monitor the torque to ensure the pile is driven deep enough and has the required stability.
- Extend the pile if needed: For deeper foundations, you can extend the pile by adding more sections.
- Secure the pile: Once it reaches the required depth, secure it.
Installation Methods and Techniques
Residential vs. Commercial Projects
The method you use to install helical piles will vary depending on the project. Smaller-scale equipment is typically used in residential projects, and installations are often manually guided. Larger commercial projects require more robust machinery and automated systems to handle heavier loads.
Advanced Techniques
Specialized pile-driving equipment and methods may be needed for more challenging projects, such as those involving rocky soil or high water tables. Adjusting the number or size of piles can also help meet higher load requirements.
Also Read: Helical Piles Installation Mistakes to Avoid: Lessons from the Field
Quality Control and Testing Post-Installation
Ensuring Proper Installation
Once the piles are installed, quality control is essential. In a visual inspection, check that the piles are aligned correctly and installed to the required depth. Then, monitor the torque to ensure the pile meets the design specifications for stability.
Post-Installation Testing
Testing the load-bearing capacity of the piles will confirm their effectiveness. Standard tests include tension testing, which ensures the pile can resist pulling forces, and compression testing, which verifies the pile can handle downward pressure.
Common Challenges in Helical Pile Installation and How to Overcome Them
Residential Project Challenges
Space constraints or working around existing structures can make residential installations tricky. However, smaller equipment and experienced contractors can help navigate these obstacles.
Commercial Project Challenges
For commercial projects, managing heavy loads and large-scale installations can be challenging. Specialized equipment and careful planning are crucial to overcoming these issues.
Maintenance and Long-Term Performance
Regular inspections are crucial to maintaining the integrity of your foundation. Look for any signs of wear or movement, and schedule routine maintenance to ensure the piles remain in top condition.
Look for cracks in walls, uneven floors, or shifting structures. These could be signs that your helical piles aren’t performing as expected, and immediate action should be taken to address any issues.
Also Read: Signs Your Home Needs Helical Piles
Choosing the Right Contractor for Helical Pile Installation
Key Qualities to Look For
Finding the right contractor is crucial for a successful installation. Look for companies with:
- Experience: A strong track record in both residential and commercial helical pile installations.
- Certifications: Ensure they hold relevant certifications and comply with industry standards.
Questions to Ask Potential Contractors
Before hiring, ask:
- How long have you been working with helical piles?
- Can you provide references from similar projects?
- What is your process for dealing with unexpected challenges?
The Importance of Certifications and Compliance
It’s essential that your contractor adheres to all industry standards and holds the proper certifications. This ensures the quality of the installation, as well as the safety and long-term stability of the project.
Make GAMCON Your Trusted Source for Helical Piles
Helical piles are an efficient and effective solution for both residential and commercial construction projects. When installed correctly, they provide long-lasting support and stability. By following the steps outlined in this guide and choosing the right contractor, you can ensure a solid foundation for your next project.
Need expert advice on your helical pile installation? Contact GAMCON today to discuss your project needs and get tailored solutions from experienced professionals. GAMCON is your top choice for helical piles in Toronto and the GTA. We’re not just another construction company; we’re a team of skilled specialists with a shared passion for creating the unseen foundations that make Toronto’s buildings stand tall. Whether you are planning a residential or commercial project, we have a solution, even if the space, soil conditions or complexity are demanding.
Call GAMCON today at (416) 888-4188 or complete our convenient online form to learn how we can help you create a strong foundation.